Step-by-Step Instructions
DAY 1: The Evening Before (5 Minutes of Work)
- Combine Dry Ingredients: In a large bowl, whisk together the flour, salt, yeast, rosemary, and garlic.
- Add Water: Pour in the warm water and stir with a wooden spoon or your hands until just combined. The dough will be shaggy, sticky, and messy. This is correct.
- First Rise (Bulk Fermentation): Cover the bowl tightly with plastic wrap or a damp towel. Let it rest at room temperature (68-72°F) for 12-18 hours. Overnight is perfect. The dough will be bubbly, doubled in size, and dotted with holes on the surface.
DAY 2: Baking Day
- Shape the Dough (Handle Gently!):
· Generously flour a work surface and your hands. The dough is very sticky.
· Scrape the dough out onto the surface. With floured hands, gently fold the dough over itself a few times (4-5 folds is plenty) to form a loose ball.
· Pro-Tip: Instead of a traditional shaping, you can simply use a bowl scraper or bench knife to tuck the edges under to create a “boule” (round loaf). The less you handle it, the more open the crumb will be. - Second Rise (Proofing):
· Place a sheet of parchment paper on a plate or small baking sheet and generously dust it with flour or cornmeal.
· Place the shaped dough seam-side down on the parchment.
· Cover loosely with the plastic wrap or towel and let it rise for 1-2 hours, or until it looks puffy and has risen slightly. It won’t double. - Preheat the Oven:
· About 30 minutes before the second rise is finished, place your empty Dutch oven with the lid on into the oven.
· Preheat the oven to 450°F (230°C). - Score and Bake:
· Once the oven is hot, carefully remove the Dutch oven (it will be extremely hot!).
· Using the parchment paper as a sling, gently lower the dough into the hot Dutch oven.
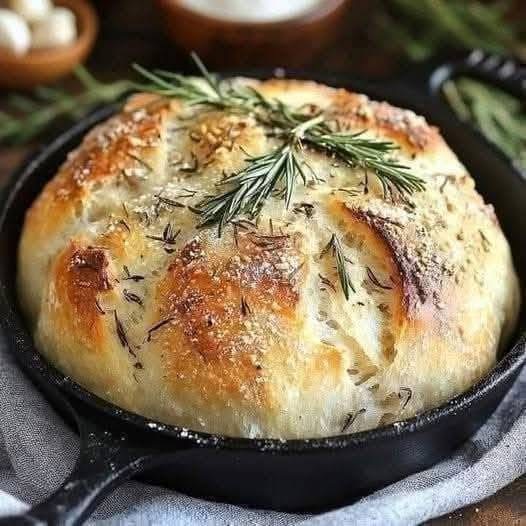
· Using a sharp knife, razor blade (lame), or serrated knife, make one or two quick, confident slashes (about ½-inch deep) on top of the dough. This allows the steam to escape and controls the expansion.
· Put the lid back on and place it in the oven. - The Bake:
· Bake with lid on: 30 minutes
· Bake with lid off: 10-15 minutes
· The bread is done when it has a deep, golden-brown crust and sounds hollow when tapped on the bottom. An internal thermometer should read 200-210°F (93-99°C). - Cool Completely:
· Transfer the loaf to a wire cooling rack. This is non-negotiable. You must let it cool for at least 1 hour before slicing. The bread is still cooking internally, and cutting it warm will result in a gummy texture.
Expert Tips for Success
· Yeast is Flexible: If you want it to rise faster, use 1 tsp of yeast. For an even more complex, sourdough-like flavor, let it ferment for a full 24 hours.
· Don’t Skip the Dutch Oven: It traps steam from the dough, which is essential for creating a crisp, glossy, professional-quality crust.
· Flavor Variations:
· Sun-Dried Tomato & Olive: Add ¼ cup chopped sun-dried tomatoes and ¼ cup chopped kalamata olives with the dry ingredients.
· Cheesy Herb: Add ½ cup grated Parmesan or Asiago cheese.
· Whole Wheat: Substitute 1 cup of bread flour with 1 cup of whole wheat flour.
· Troubleshooting:
· Dough didn’t rise? Your yeast might be old, or the room was too cold.
· Bread is too dense? You may have over-handled the dough during shaping or didn’t let it proof long enough.
· Crust isn’t crispy? Make sure your oven is fully preheated and you baked with the lid on for the full 30 minutes.
Enjoy the incredible aroma and the satisfaction of baking a beautiful, rustic loaf that looks and tastes like it came from a professional bakery